Locate the processor socket on your motherboard. Raise the lever on the socket and slowly put the processor in place. (Shown right is socket 462.)
You have to make sure that the pin 1 of your CPU goes into the pin 1 of your CPU socket. You can do this by looking for a little 1 on the processor chip and on the processor socket on the motherboard. If the processor doesn't get put in with the ones matching, the CPU will not fit right inthe socket. If this is the case, don't try to force it in. It will go in gently and easily if you fit it correctly. Once the processor is in, you can close the lever. The processor is now securely held in the CPU socket. Locate the processor socket on your motherboard. Raise the lever on the socket and slowly put the processor in place. (Shown right is socket 462.)
You have to make sure that the pin 1 of your CPU goes into the pin 1 of your CPU socket. You can do this by looking for a little 1 on the processor chip and on the processor socket on the motherboard. If the processor doesn't get put in with the ones matching, the CPU will not fit right inthe socket. If this is the case, don't try to force it in. It will go in gently and easily if you fit it correctly. Once the processor is in, you can close the lever. The processor is now securely held in the CPU socket.
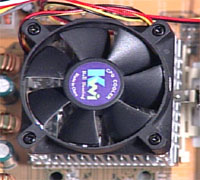 If you bought a CPU in a retail box, it should include a heatsink & fan. If you bought a CPU that didn't come with one, make sure the fan's correct for the speed for your CPU. If it isn't, your CPU will overheat and behave abnormally, produce false results, or could be damaged. Take off the plastic cover from the bottom of the CPU fan that covers the heat transfer pad. Now place the CPU fan on top of the CPU and push down the metal clips on the fan so that it clips onto the CPU socket. (Please Note: Instructions above are for a Pentium III Socket 370 chip. Directions for installation of your fan/heatsink may be slightly different depending on your processor. Consult the manual that came with your processor before doing this.) If you bought a CPU in a retail box, it should include a heatsink & fan. If you bought a CPU that didn't come with one, make sure the fan's correct for the speed for your CPU. If it isn't, your CPU will overheat and behave abnormally, produce false results, or could be damaged. Take off the plastic cover from the bottom of the CPU fan that covers the heat transfer pad. Now place the CPU fan on top of the CPU and push down the metal clips on the fan so that it clips onto the CPU socket. (Please Note: Instructions above are for a Pentium III Socket 370 chip. Directions for installation of your fan/heatsink may be slightly different depending on your processor. Consult the manual that came with your processor before doing this.)
The CPU fan has a power connector which needs to be connected to CPU fan power socket on your motherboard. If you can't find this slot, consult the manual that came with your motherboard. The manual should give you a diagram of the motherboard and show you where the slot is for the power. Finally, you have to specify what frequency (speed) your CPU is running at. This can be done using jumper settings on the motherboard, or on some modern motherboards it can be done in the BIOS(an interface between the operating system and the hardware), or your motherboard may have automatic detection for your CPU frequency. You will have to read your motherboard manual for more details.
|